Toyota Tundra Discussion Forum banner

Rear Brake Job w/new rotors

164K views 75 replies 42 participants last post by  Johnl999  
#1 · (Edited)
I decided to take a few pics of my brake job and turn them into a DIY. I know there are a couple threads out there, but IIRC, they don't do a step by step with pics. Here goes.

First, break the lug nuts loose. Lift and support the axle with jack stands. I leave the jack in place as an extra measure.
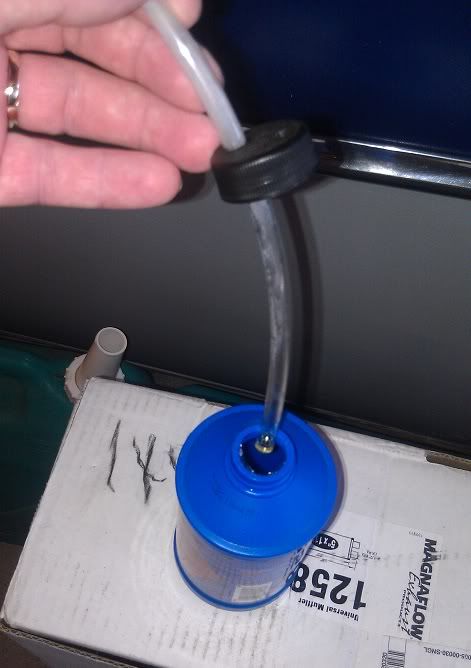
Remove the wheels and attach a bleed container to the bleeder fitting. The container should have a few ounces of clean brake fluid in it.
Image

Image


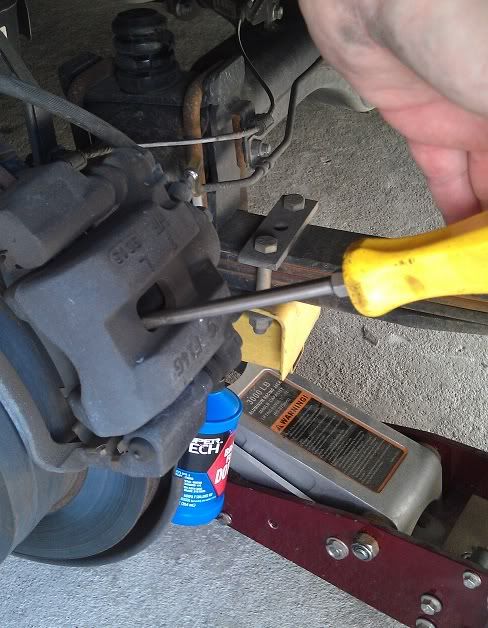
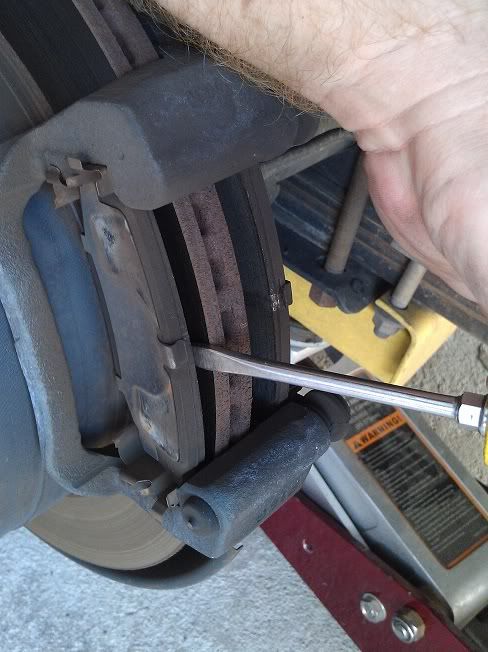
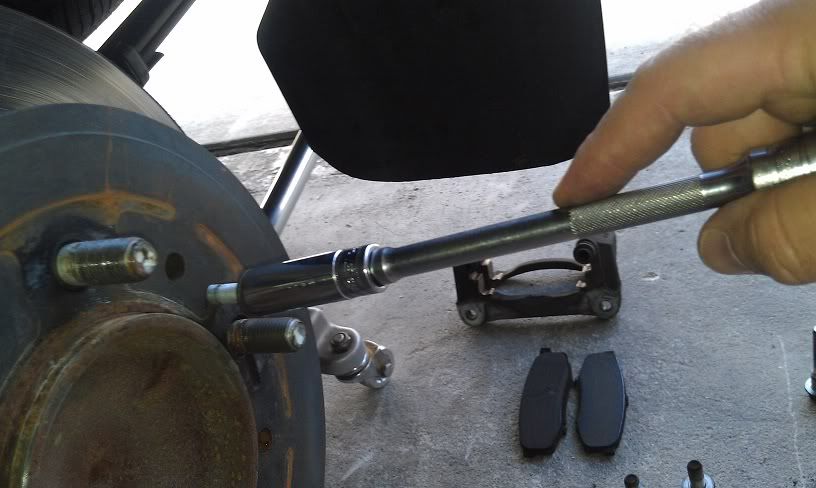
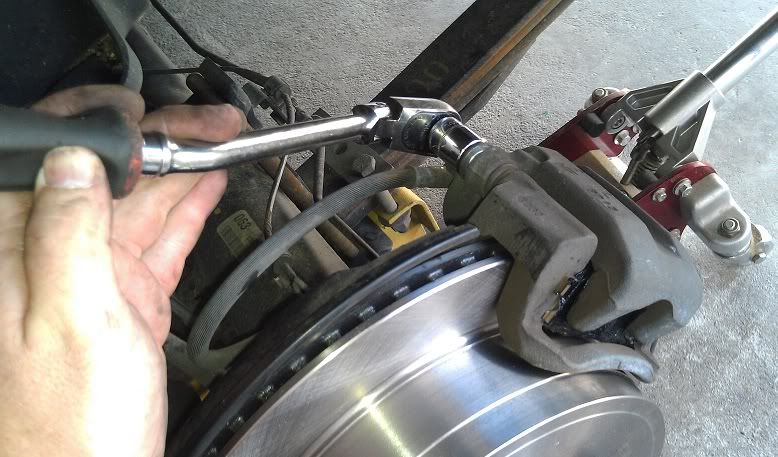
Loosen the bleeder and compress the caliper by wedging a flat blade screwdriver between the brake pad and the rotor, then pry the pad away from the rotor. Do not go between the pad and the caliper piston as you can tear the dust boot or damage the caliper piston.
Image


Remove the caliper from the caliper bracket and lay it on top of the axle. Do not let it hang by the brake hose.
Image

Image


Remove the brake pads from the caliper bracket.
Image


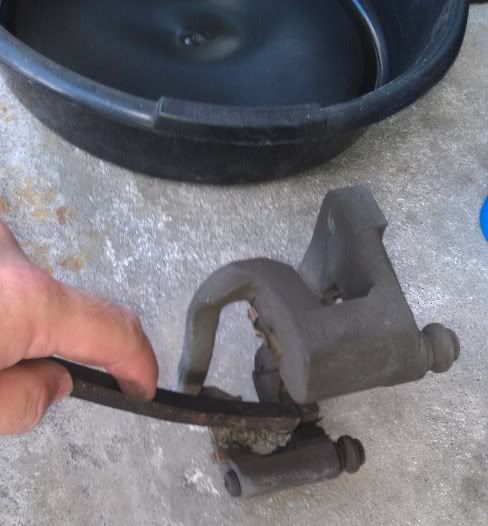
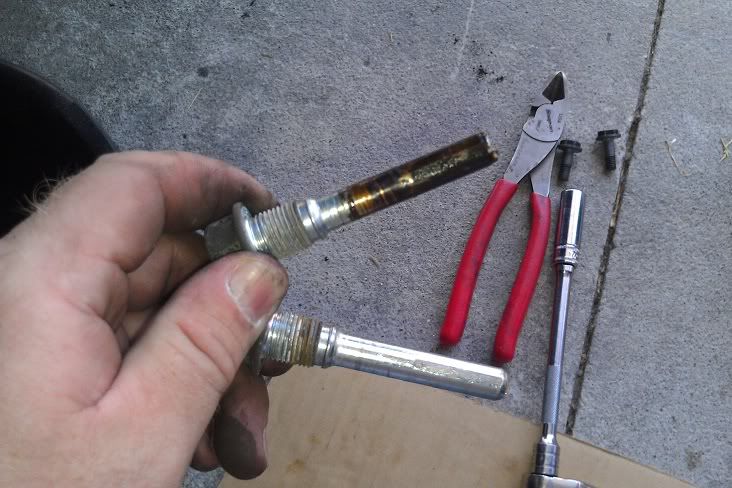
Remove the caliper bracket.
Image

Image


Clean or replace the brake hardware that the brake pads fit into.
Image

Image


Remove the disc brake rotor. If it is seized to the hub, use the threaded holes provided by threading a bolt through the hole to press the rotor from the hub.
Image

Image

Image


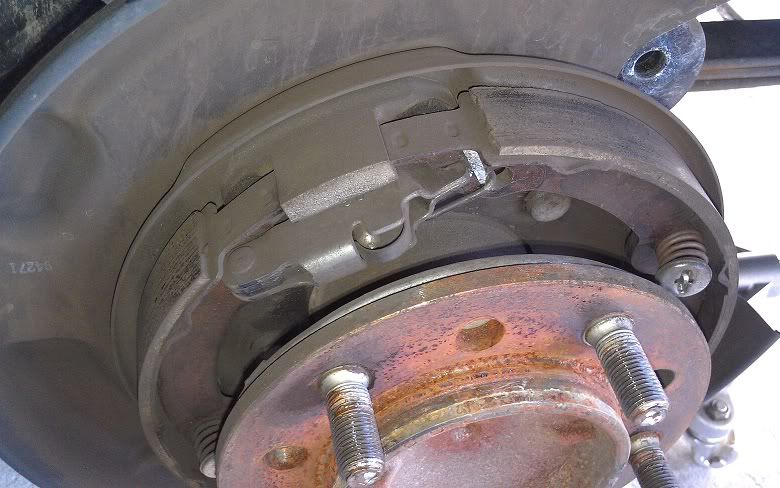
With the rotor removed, inspect the parking brake shoes and clean or replace if necessary.
Image


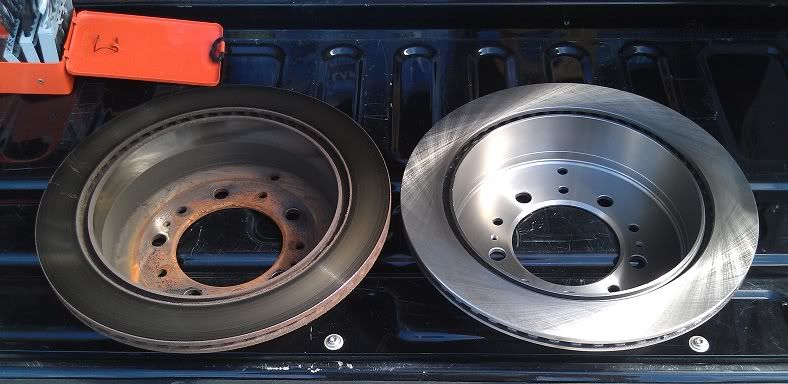
Compare the new rotor to the old one to be sure they match. It's not uncommon to find brake rotors that are misboxed from the manufacturer. You will also need to transfer the rubber inspecion hole plug from your old rotor to the new one. If you have your old rotors turned/machined, remove it before doing so.
Image


Clean the new rotor with brake cleaner and dry it with a paper towel. Don't use a shop rag. The fibers melt to the pads and rotor, not to mention the detergent they are washed in. Paper towels or compressed air is best.
Image

Image


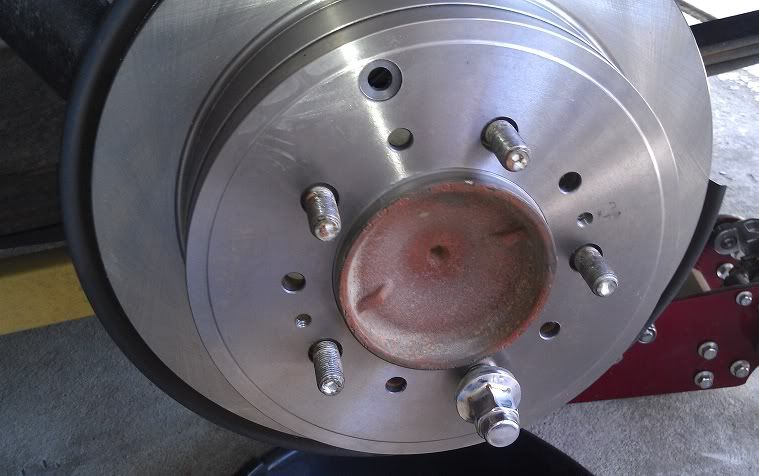
Clean the hub with a wire brush and apply a light coat of anti-seize compound. Don't use too much. If it gets behind the rotor, it can warp it as the lug nuts are torqued.
Image

Image


Install the new (or machined) rotor and run up one lug nut finger tight. This will hold the rotor to the hub while you install the pads and caliper later.
Image


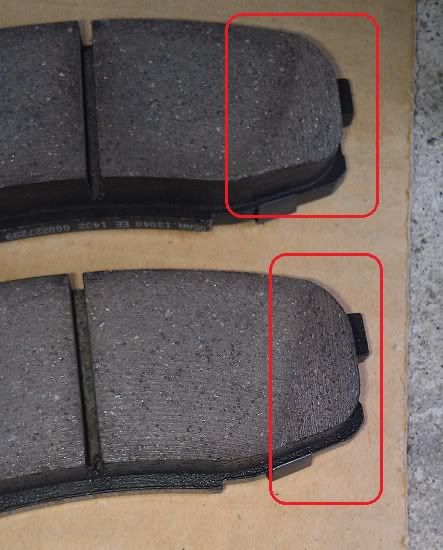
Your new brake pads should be chamfered on the ends to prevent squeaks. If they are not chamfered, it's ok to add the chamfer with a bench grinder or file.
Image

Image


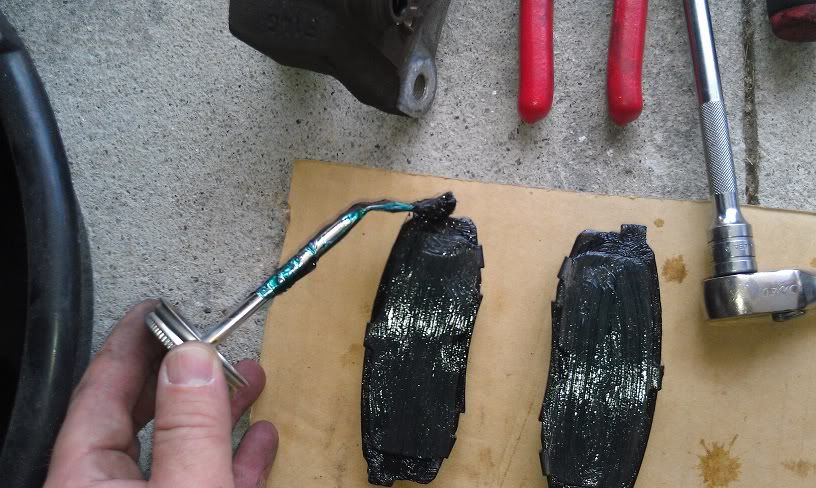
Apply brake caliper lubricant to the back of the brake pad...NOT THE FRICTION SURFACE... to reduce vibration transfer to the caliper. This will reduce squeaks. Also apply lube to the ends of the pad where they slide in the caliper bracket.
Image

Image


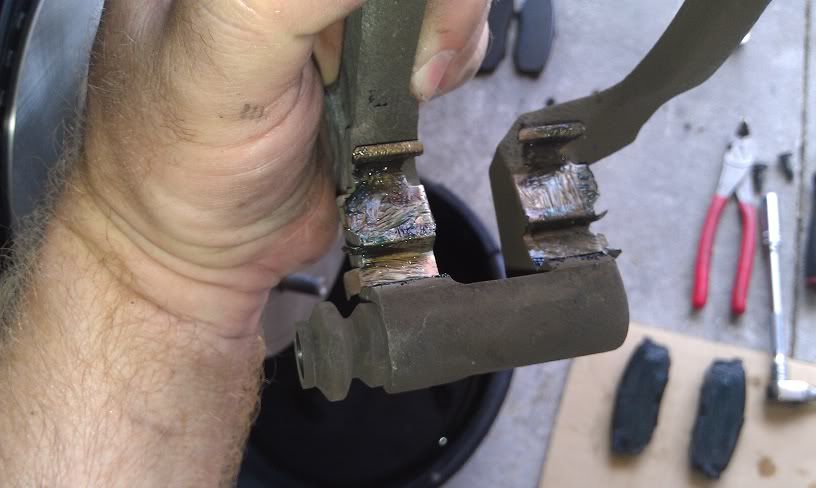
Apply caliper lube to the caliper bracket anywhere the brake pad will contact it. Also lube the guide pin holes where the caliper attaches to the bracket.
Image

Image


Reinstall the caliper bracket.
Image


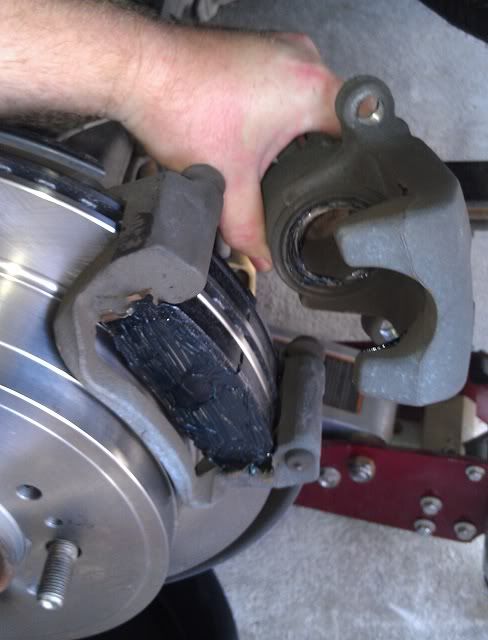
Insert the brake pads into the caliper bracket. Clean the caliper guide pin/bolts and lubricate them. Lubricate the caliper piston and install the caliper.
Image

Image

Image

Image

Image


Top off the master cylinder with DOT 3 brake fluid. Remove the lug nut that was installed to hold the rotor in position, then reinstall the wheel. Repeat for the other side.
Image

Image


Don't forget to pump the brakes to position the pads against the rotors before driving it. There is no reason to bleed the system. Using this method, there is virtually no way to draw air into the brake lines. As you compress the caliper, old fluid is pushed into your bleed container. As the caliper reaches full compression, tighten the bleed screw before removing the hose from the bleeder.

Remember to ALWAYS torque the wheels to specification by hand. These trucks are prone to rotor warpage and overtightening the lug nuts is an easy way to warp them.


Image
 

Attachments

#2 ·
I'm going to take a few pics of the bleed container I made out of the brake fluid bottle and explain why it's worth using one.
I also want to add that you need to pump the brake pedal to seat the pads against the rotor before driving the truck. Don't use full strokes to do this. Use slow short strokes. This way, you avoid pushing the master cylinder plunger into unused territory. It can ruin the master cylinder on older cars with corrosion in the bore. Better safe than sorry.

I've used tons of different brand of brake parts over the years and, for the price, Centric is the best I have found. I use PosiQuiet pads, but not the extended wear version. The "extended wear" pads are more dense and, therefore, squeak prone. The Centric pads don't require burnishing and are the most squeak free ceramic brake pads I have ever used. I have also never had to warranty a Centric rotor...even with their cheap line.


I also wouldn't recommend using a vacuum bleeder on these trucks. I don't use vacuum bleeders at all anymore. A pressure bleeder on the master cylinder has far better results. I've seen cars have no pedal whatsoever after conventional bleed procedures. German cars and GM trucks are notorious for it. A pressure bleeder works every time and will correct the "no pedal" problem created by conventional bleeding. Many systems also require a scantool to actuate the ABS bleed procedure. Using my method, you remove the old fluid from the caliper without requiring a bleed afterward. I would not attempt a full bleed or fluid exchange at home without having a pressure bleeder and scantool with ABS capability handy.

Here's some info on the bleed container I used. It's just a brake fluid bottle. I drilled 2 holes in the lid. One hole is just a vent to prevent pressure buildup in the bottle. The other hole is for the clear plastic flexible line. I drilled the hole so the line fits snugly and had to be forced into the hole. That way you can suspend the bottle if you need to and it helps keep it more stable to work with. The flexible clear line is simply aquarium air line from WalMart. It's cheap. Cut a length of line long enough to keep the bottle out of your workspace and below the caliper or wheel cylinder you are working on. It should reach the bottom of the container when the lid is installed on the bottle. The container should have a few ounces of clean brake fluid in it. This will ensure that no air can be sucked back into the brake system. Once you attach the line to the bleeder, open the bleeder about a quarter tuen and begin compressing the caliper. Do not stop until there is no air remaining in the plastic line. You now have an air free passage to reserve brake fluid. In the case that someone were to mistakenly pump the brake pedal or open another bleed fitting with one bleeder still open, the brake system will pull brake fluid from the bottle, not air. Here are a few pics of the bleed container.

Image


Image


Image
 
#40 ·
Sorry I'm late into the game. I just now decided it'd be time to replace my brake pads. My '08 has 58K miles. 46k was mostly highway roads (the Tundra was driven once a month). The latter part of the miles (12K) were used to tow a toy hauler.

I've bled brakes on small cars but never trucks so this will be a first for me. But it appears y'all are suggesting our Tundras don't require the brake lines to be bled. If that's the case could you please clarify below for me? I want to make sure I'm doing this right.

Using my method, you remove the old fluid from the caliper without requiring a bleed afterward...Once you attach the line to the bleeder, open the bleeder about a quarter tuen and begin compressing the caliper. Do not stop until there is no air remaining in the plastic line. You now have an air free passage to reserve brake fluid.
So when you say "begin compressing the caliper" are you saying to "compress the caliper by wedging a flat blade screwdriver between the brake pad and the rotor, then pry the pad away from the rotor"??? As in one motion of prying the pad away from the rotor = moving oil brake fluid out, and close the bleeder? That's it? Sounds like that's less than a 30 second bleed job. Is this right?

Or are you saying I just need to crack open the bleeder screw, and just let the old fluid drain itself out without pumping the brakes until there are no air bubbles in the clear line?

Sorry. I'm confused.
 
#4 ·
Nice write-up, thanks for sharing. I had to run out to my truck and check the brake fluid type. It is DOT 3. My past few german vehicles have all been DOT 4, so I was suprised to see DOT 3 was still being used.

I'm not sure I'd use that much anti-chatter grease on the pads though. It's going to ooze once it gets hot.
 
#5 ·
Nice write-up, thanks for sharing. I had to run out to my truck and check the brake fluid type. It is DOT 3. My past few german vehicles have all been DOT 4, so I was suprised to see DOT 3 was still being used.
Yup, most American and Asian cars use DOT3, while most European cars use DOT4. I keep both on hand since we also have a BMW.
I'm not sure I'd use that much anti-chatter grease on the pads though. It's going to ooze once it gets hot.
The Permatex synthetic lube is a high temp grease. Your rotors will probably glow in the dark before this stuff gets runny. I've used it for many years without an issue of oozing.
 
#6 ·
now that is how to do a break job my friends. Bravo! socal57chevy
 
#9 ·
Good work and write up.
 
#10 · (Edited)
Thanks guys. I have all the stuff for my front brake job. Things have been hectic around here, but I hope to have time to do them in the next couple days. I'll do the same write up and add it to this thread and ask a mod to change the title to front and rear brake job. Stay tuned.

I wanted to add a couple PDF files to this thread complements of Mendonsy...
 

Attachments

#11 ·
Dealer recommended my front brakes changed when I hit 36K. They said back was still okay. What mileage did you have when you did the rear SoCal? What is the recommended mileage for changing rear. Also, the rear disc you replace looks like it won't rust. Are they stainless steel or something?
 
#12 ·
Dealer recommended my front brakes changed when I hit 36K. They said back was still okay. What mileage did you have when you did the rear SoCal?
I did the rear at about 65-70K. Mileage depends on how hard you use them and what friction material you have. Toyota uses ceramic friction material from the factory. Adding a trailer will accelerate brake wear, as will racing up to stop lights then slamming on the brakes. Mountain driving will tend to wear brakes faster, too.
What is the recommended mileage for changing rear.
These are bonded, so when the friction material reaches 1/16" at the thinnest point, it's time to change them. There is no recommended mileage for brake pad replacement.
Also, the rear disc you replace looks like it won't rust. Are they stainless steel or something?
No, they will rust.
 
#13 ·
To add, the dealer replaced my front pads and turned the rotors at about 25K due to vibration and steering wheel oscillation on braking. Fronts are getting new rotors, too.
 
#14 ·
i would almost swear that was me doing that brake job, except my screwdriver is red lol.

It is really amusing to see an old school guy do brake jobs and skip alot of those steps. you would be really surprised how much that lube and bleeding the calipers in that fashion can improve the pedal feel.

Fantastic write up! :respect:
 
#17 ·
LOL
My snap on guy tells me they discontinued those yellow handles. :mad:
I still have the 57Chevy commemorative screwdriver set in the wrapper. They have turquoise handles and a bow tie. Still kicking myself for selling the 57 roll cabinet.
 
#15 ·
Thanks for the great write up...looking forward to the one for the front brakes.

I have a Motive pressure bleeder which I have used on other vehicles with great success. I haven't flushed the Tundra's brake system yet, but plan to next year as I believe in doing it every three years on a street driven vehicle that is not tracked. You mentioned needing a scan tool to activate the abs pump to do a thorough flush. Is there danger of trapping air in the system if you don't use one?
 
#16 ·
Love pressure bleeders. If you use a pressure bleeder, you probably won't have an issue. I don't feel that a scantool is necessary for a bleed, but may be the only way out of a jam if air does make it into the system. I'd be sure to have access to one before doing a full flush. Most of my gun shy attitude toward flushing without a scantool comes from GM vehicles.
I've never had an issue with "no brake pedal after a bleed" when using a pressure bleeder. Not so with vacuum bleeders. Pressure bleeders, ftw!
 
#18 ·
Excellent write-up. This is how I performed my brake upgrades as well. Instead of doing this all over again in my thread, I thought I would direct people your way. Hope you don't mind!

I have misplaced my Motive power bleeder...as soon as I can find that, I am sure that any sponge, left from my vacuum air compressor bleeder setup, will be gone.

Thanks for your contribution!
 
#19 ·
When you compressed the rear caliper piston do you have to screw it in? some vehicles need pressure and a twist to get the piston to move back into it's bore because the piston is threaded.. Also, what about just popping the cap off the master cylinder? That way you'll never get air in the system upon piston compression. I usually just take the Cap off, cover the master with a rag, catch the excess, then make sure I add as needed without letting the level get too low?
Would this be acceptable as well?
 
#20 ·
When you compressed the rear caliper piston do you have to screw it in? some vehicles need pressure and a twist to get the piston to move back into it's bore because the piston is threaded..

These calipers/pistons are not threaded. Just press them back in.
Also, what about just popping the cap off the master cylinder? That way you'll never get air in the system upon piston compression. I usually just take the Cap off, cover the master with a rag, catch the excess, then make sure I add as needed without letting the level get too low?
Would this be acceptable as well?
I never recommend pushing fluid backwards in ABS brake systems. Pushing contaminated fluid backwards into ABS components can kill them. The worst fluid is always at the calipers and opening the bleeder before compressing the caliper is an easy way to get rid of the worst fluid in the system while avoiding contamination of delicate ABS components.
Not saying it can't be done, just that it shouldn't be done.
 
#23 ·
I'm doing the rear rotors on my '07 now and have had them apart twice now due to the rotors heating up excessively.

I traced it down to the parking brake hanging, so my question is what is the procedure for setting the proper parking brake clearance?
Great question. I haven't had to adjust mine or any on customer vehicles. GM has a specific procedure for setting the adjustment on their late model trucks. I'd have to say post up a thread asking someone to post up a pdf of the adjustment procedure. I don't have access to the info any more.

Check the cable to be sure you haven't snagged it on anything.
 
#24 ·
Then while you have your calipers off and disassembled, throw on a coat of caliper paint!
Image

Image

Sorry I like clean!
 
#29 ·
Tundra5-0 and Sabre01: what do you use for coatings (paint) in these applications? It looks like Tundra5-0 painted EVERYTHING. The wheel well liners, the frame, the springs and mounts, the shock absorber bodies, well, just everything. Does one type of paint handle all the various materials?

I envy that clean, uniform appearance, and I'd love to know what you are doing to get it and maintain it.

Thanks!
 
#30 ·
Oh, and pardon me for being remiss and failing to say...

Thanks for this great post! I will be bringing my Tundra in for it's 25k maintenance soon, and intended to repair/replace the brakes as needed on my own to try to save some cash. I did my own (disc) brake work on my motorcycle, so was feeling fairly comfortable at the notion of tackling this on my own too.

But this writeup (with pics!) increased my level of comfort immensely.

That being said, it seems that I may not need any brake work for a while, as all of my measurements exceed the minimums. Actually, they seem to exceed the 'standard'. For instance, from what I can gather, the 'standard' measurement for the front rotors is 28 mm, with 26 mm being the minimum before replacement is required.

My rotors measured over 32 mm. Now, while I am willing to concede that I may not have been terribly accurate (though I think I was), even assuming that I was off by a mm or two, I am not only above the minimum, but I am well above the 'standard'.

Does anyone know what the nominal thickness on a new rotor might be? I have not been able to find that info (yet) online, and I don't have any new rotors around to test.

I wanted to check my breaks BEFORE I took it in for maintenance as a sort of litmus test. It *feels* as if, whenever I have ever brought any vehicle in for tire related service, the mechanics almost always recommend brake work, and typically (it seems) suggest new rotors. I have never pre-inspected them in the past, and am always pressed for time, so in the past I have just taken them at their word.

It will be interesting to see if, as part of my 25k checkup, new pads or rotor are recommended.

Thanks again!
-The Onceler
 
#32 ·
Well, after my 25k service, the dealer presented me with a fairly detailed service log. Among the other information, the service tech noted the wear on the pads and rotors. His numbers matched mine fairly closely. So, if nothing else, at least I can feel reasonably sure that the techs are not suggesting unnecessary maintenance.

Oh, and the overall cost was less than I had anticipated, so that was nice.
 
#35 ·
Great write-up! Thanks for posting!