Toyota Tundra Discussion Forum banner
41 - 60 of 68 Posts
Ok, gotta ask, how did you tighten the mounting screws for the bracket, for your contoler? :confused:
I have mine mounted in the same place and I did not use the bracket. I put some double sided tape on each side of the controller but even that was not necessary. The controller will move ever so slightly left to right if you actually push on it, however, overall it is pretty firmly in place without a bracket. Personally, I think this is the perfect location and it is completely out of the way.
 
Ok, gotta ask, how did you tighten the mounting screws for the bracket, for your contoler? :confused:
I'll post pics and a little narrative of my install some time this week, but I can tell you now that I didn't use the bracket that came with the controller. I made a custom bracket and it worked great for me and the thing doesn't budge. VERY happy with the decision to mount it in this location and would highly recommend it over the alternatives.
 
My wife had a great Idea to mount it under the steering column with double sided Velcro so it wouldn't hit my knees and it actually fits and works pretty good in that location. The rv dealership wanted to charge me like 218$ to install it lol that's a joke!
 
  • Like
Reactions: safety77
Ok, here is a brief description of how I installed my P3 along with some pics. All in all, it took me a couple hours of tinkering to get everything just right, but very happy I took the time to do this. Hopefully someone finds this useful.

1. Detached the lower dash panel and relocated traction control button next to tow/haul button in front of the shifter. This required lengthening the wires for the button so it would reach the new location, so I spliced in a +/- 6" length of wire (22 gauge I think). Also had to trim some of the tabs on the button itself so it would fit in the new slot.
SPLICES TO EXTEND WIRING
Image

TRIMMED TABS ON TRACTION CONTROL SWITCH
Image

NEW TRACTION CONTROL SWITCH LOCATION
Image


2. Carved an opening in the trim plate where the traction control button came from to accept the P3 (I used a utility knife, but if you have a dremel it would be a lot quicker/easier).
CARVED TRIM PLATE
Image


3. Made a bracket using a Simpson Strong Tie and attached it to the lower dash panel using self tapping screws through the plastic tabs behind the slotted opening directly below the old traction control button location (not sure what's SUPPOSED to go there, but whatever it is, I don't have it on my truck).
CUSTOM BRACKET
Image

BRACKET MOUNTING LOCATION
Image

MOUNTED BRACKET
Image

Image


4. Attached a +/- 4" length of perforated metal strap to the P3 using some black button head screws I bought (could have used the screws that came with the controller, but since they're zinc and you can see them once it's installed, I opted to go with black to make them disappear a little). Also trimmed the corners off of the straps so the button head screws covered it up so you can't see it after it's all installed.
STRAPS WITH TRIMMED CORNERS
Image

STRAPS ATTACHED TO P3
Image


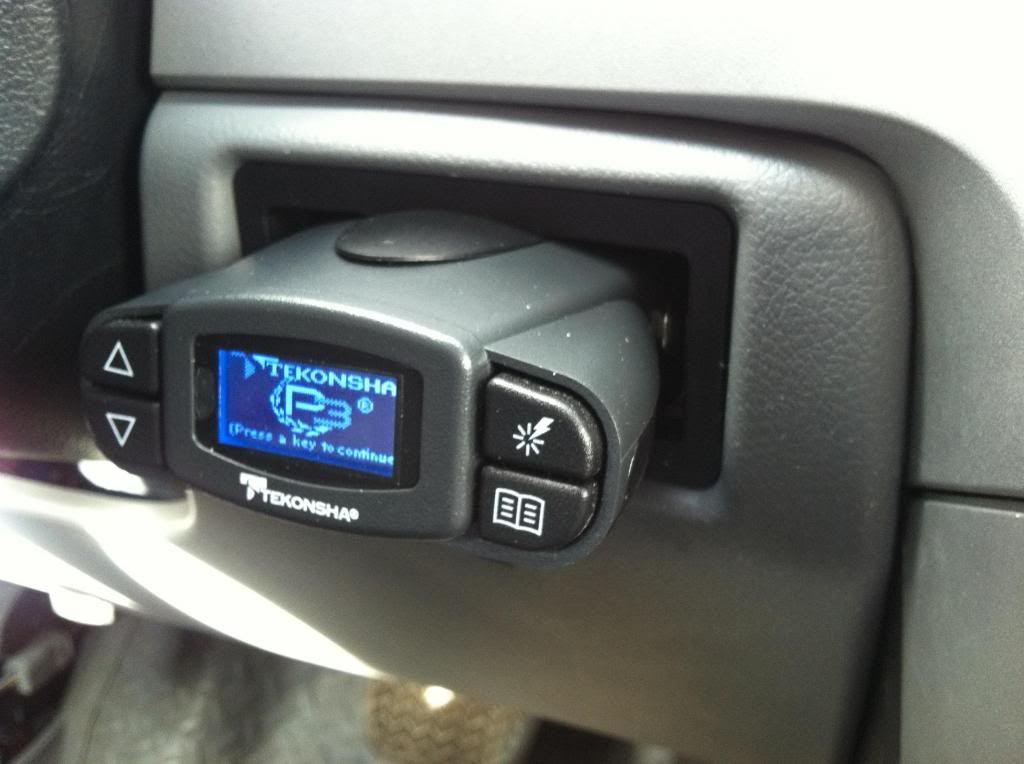
5. Slid the P3 in place and bent the metal straps around the bracket I made in step 3. I was going to through-bolt the strap to the bracket, but once I wrapped the strap around the bracket, it didn't budge, so I decided to skip this step.
P3 SECURED IN PLACE WITH STRAP BENT AROUND BRACKET
Image

Image


6. Ran the wiring harness from the pre-wired plug behind the kick panel next to the e-brake, connected to the brake controller and re-installed the lower dash panel. I bought a wiring harness specific for the truck so I didn't have to splice the P3 harness to the pigtail that came with the truck (about $12 on Amazon).
COMPLETED INSTALL
Image

Image
 
Nice idea on the bracket.
 
That's where mine is mounted as well. I'm 6'4 & don't have a problem.
I also mounted mine w/ heavy duty velcro in case I didn't like the position. It hasn't come off in 90+ degree or -4 degree temps.
Mine is in the same place. Rarely ever use it anymore though since we use the diesels to pull everything.
 
Thanks guys for giving me ideas: there are so many good options on my P3 install location. After days of indecision, I figured I would just temporarily mount it on these empty rectangular fillers. I just wasn't yet ready to make any major dremmel cuts/ bezel destruction/ holes...

BTW what are the spaces for?


Maybe a stupid question, but does the controller need to be horizontally flat due to the proportional braking? I'm installing my p3 on Monday and I'm worried about positioning it correctly .
 
I mounted my Primus behind the gear shifter. I did not place it in the cubby between the power points b/c it would have been outside of my sitting normal reach (without having to lean for it) and it would also be behind large cups (something I didn't want to be in the way should the need arise for it in a hurry). I shaved down the sides of the dash trim with a file. The controller I s held in place by the pressure of the trim piece, it ain't going anywhere unless I move it. I did add 6" of wire to the ground but be wire was needed for the others.
 

Attachments

I have been pondering this also. I'm glad I performed a search on it this evening. It appears that the general consensus is to mount it in the center cubby between the 12 volt power supplies. It also appears that the p3 is the most widely used.

What I don't understand is why the Tundra doesn't come with a ebcm I mean gee wiz it does have a 10,000lbs towing capacity. Standard with a class IV hitch that is built into the construction of the framework. Pre-wired 4-pin and 7-pin trailer plugs. So why skimp out on a ecbm?
 
41 - 60 of 68 Posts