

I thought that I would post up this little project of mine in case it helps anyone. I got a Smittybilt M1 front bumper back in December. Since then I haven't had use of my parking sensors because the front M1 doesn't come with provisions for it. And because the M1 is such thick steel, you can't simply drill it and pop the mounts in. So this is how I fixed it:
What you need:
Step 1) Internet shopping! You are going to want to hit up TRD Sparks' sister site for OEM parts to get 2 of the parking sensor retainers if yours are broken. I think it's item #5 here but not sure. If you have a 2010 it's part number 89348-34020.
Step 2) Parts run! Find a hardware store with the largest selection of random hardware and go hunting for machine bushings. You need to find two that are 18ga with a 7/8" ID (you likely could go thicker but 18ga was the closest I could find). And while you are there, get some Metal epoxy, a 1 1/16" metal hole saw (yes, that specific size), and a replacement for the 3/32" drill bit that you have likely used to drill pilot holes in everything for the last couple of years.
These are the bushings that I bought, for reference. Note, the pic on the right makes the bushing seem narrower than it is. Regardless the 1 1/16" hole saw will provide enough overlap while being just large enough for the sensor bracket.
![]()
![]()
Step 3) Figure out where you want to drill two big gaping holes in your really expensive bumper. Make sure that you don't drill too close to the bumper's seams because the welds on the backside are fairly good sized. And make sure that you put the hole where you have enough wire to reach. Sorry for the fuzzy pic. This was attempt number one on the driver's side. I ended up moving it down and in a little because of the welds.
![]()
Step 4) Take your 3/32" bit and drill your two pilot holes to help keep the hole saw on course. Then take a deep breath, shout out an apology to the neighbors for the unholy amount of noise that you are about to unleash, and drill two big ugly holes in your beautiful bumper.
![]()
Step 5) Break out the sanding disk, wire wheel, whatever you got and remove the powder coat around the back side of the holes. The goal is to remove an area just slightly larger than the size of the bushing. You may also want to take a file to the holes just to smooth them out a little. I would've taken a picture but I lost motivation after trying to cram a drill up in there with a wire wheel.
Step 6) Scuff up both sides of the bushings really good. Then mix up your metal epoxy. And using whatever you dug up for a stir stick, scoop up some epoxy and scrape it off on the outside edge of the first bushing, working your way around until you have a nice (but not excessive) bead of it around the entire circumference. Again, I would've taken a picture but epoxy covered hands plus iPhone seemed like a really bad idea.
Step 7) Using your calibrated eyeball, stick the epoxied bushing to the raw metal on the backside of the hole in the bumper, aligning the bushing's hole up in the center of the bumper's hole. Use the other end of your stir stick to scrape away any excess that oozes into the center of the hole. Once it all looks good, hold it in place for a couple of minutes to let the epoxy set up. Then repeat on the other side.
![]()
Step 8) Grab a beer and wait a good hour or so for the epoxy to cure.
Step 9) Get out the paint and give the front and the back of your masterpiece a good coat.
![]()
Step 10) Take the rest of the day off. You want the paint to be good and cured before you try jamming the sensors in there.
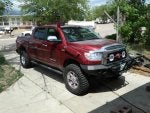
Step 11) Figure out which direction you need to align the mounting brackets so that your sensors' wires point the right direction. Then GENTLY coax the mounting brackets into their respective machine bushings. Pop your sensors into to the brackets (making sure that you have the correct sensors on the correct sides first). Connect the pigtails up to the harnesses. Zip tie up the excess wire. Then admire your flush mounted and well protected parking sensors! :beerchug:
![]()
What you need:
- Qty 2 - 18ga machine bushing with 7/8" ID
- 3/32" drill bit
- 1 1/16" hole saw
- Black paint
- Qty 2 - new sensor brackets (likely you broke the originals taking them out)
- Zip ties
- Metal epoxy
- Sanding disk, wire wheel, something for stripping powder coat
Step 1) Internet shopping! You are going to want to hit up TRD Sparks' sister site for OEM parts to get 2 of the parking sensor retainers if yours are broken. I think it's item #5 here but not sure. If you have a 2010 it's part number 89348-34020.
Step 2) Parts run! Find a hardware store with the largest selection of random hardware and go hunting for machine bushings. You need to find two that are 18ga with a 7/8" ID (you likely could go thicker but 18ga was the closest I could find). And while you are there, get some Metal epoxy, a 1 1/16" metal hole saw (yes, that specific size), and a replacement for the 3/32" drill bit that you have likely used to drill pilot holes in everything for the last couple of years.
These are the bushings that I bought, for reference. Note, the pic on the right makes the bushing seem narrower than it is. Regardless the 1 1/16" hole saw will provide enough overlap while being just large enough for the sensor bracket.


Step 3) Figure out where you want to drill two big gaping holes in your really expensive bumper. Make sure that you don't drill too close to the bumper's seams because the welds on the backside are fairly good sized. And make sure that you put the hole where you have enough wire to reach. Sorry for the fuzzy pic. This was attempt number one on the driver's side. I ended up moving it down and in a little because of the welds.

Step 4) Take your 3/32" bit and drill your two pilot holes to help keep the hole saw on course. Then take a deep breath, shout out an apology to the neighbors for the unholy amount of noise that you are about to unleash, and drill two big ugly holes in your beautiful bumper.

Step 5) Break out the sanding disk, wire wheel, whatever you got and remove the powder coat around the back side of the holes. The goal is to remove an area just slightly larger than the size of the bushing. You may also want to take a file to the holes just to smooth them out a little. I would've taken a picture but I lost motivation after trying to cram a drill up in there with a wire wheel.
Step 6) Scuff up both sides of the bushings really good. Then mix up your metal epoxy. And using whatever you dug up for a stir stick, scoop up some epoxy and scrape it off on the outside edge of the first bushing, working your way around until you have a nice (but not excessive) bead of it around the entire circumference. Again, I would've taken a picture but epoxy covered hands plus iPhone seemed like a really bad idea.
Step 7) Using your calibrated eyeball, stick the epoxied bushing to the raw metal on the backside of the hole in the bumper, aligning the bushing's hole up in the center of the bumper's hole. Use the other end of your stir stick to scrape away any excess that oozes into the center of the hole. Once it all looks good, hold it in place for a couple of minutes to let the epoxy set up. Then repeat on the other side.

Step 8) Grab a beer and wait a good hour or so for the epoxy to cure.
Step 9) Get out the paint and give the front and the back of your masterpiece a good coat.

Step 10) Take the rest of the day off. You want the paint to be good and cured before you try jamming the sensors in there.
Step 11) Figure out which direction you need to align the mounting brackets so that your sensors' wires point the right direction. Then GENTLY coax the mounting brackets into their respective machine bushings. Pop your sensors into to the brackets (making sure that you have the correct sensors on the correct sides first). Connect the pigtails up to the harnesses. Zip tie up the excess wire. Then admire your flush mounted and well protected parking sensors! :beerchug:

") The steel of my bar is 4mm thick - do you think this'll be too thick to just drill out for the sensor? Do you think I'll need to use the same technique as you? I'm finding it hard to get this information anywhere, and there are not many Tundras in Australia! If the metal thickness is a problem I may be able to machine out the back a little and then drill a hole. Thanks for any help you're able to provide (this was by far the best/most detailed post I've found about this so big thanks!)
The steel of my bar is 4mm thick - do you think this'll be too thick to just drill out for the sensor? Do you think I'll need to use the same technique as you? I'm finding it hard to get this information anywhere, and there are not many Tundras in Australia! If the metal thickness is a problem I may be able to machine out the back a little and then drill a hole. Thanks for any help you're able to provide (this was by far the best/most detailed post I've found about this so big thanks!)

